| « | July 2011 | » | ||||
| S | M | T | W | T | F | S |
| 1 | 2 | |||||
| 3 | 4 | 5 | 6 | 7 | 8 | 9 |
| 10 | 11 | 12 | 13 | 14 | 15 | 16 |
| 17 | 18 | 19 | 20 | 21 | 22 | 23 |
| 24 | 25 | 26 | 27 | 28 | 29 | 30 |
| 31 | ||||||
You are not logged in.
Log in
| « | July 2011 | » | ||||
| S | M | T | W | T | F | S |
| 1 | 2 | |||||
| 3 | 4 | 5 | 6 | 7 | 8 | 9 |
| 10 | 11 | 12 | 13 | 14 | 15 | 16 |
| 17 | 18 | 19 | 20 | 21 | 22 | 23 |
| 24 | 25 | 26 | 27 | 28 | 29 | 30 |
| 31 | ||||||
|
Tuesday, 21 September 2010
I now see another important aspect of posting a blog - or at least writing in it. A break from frustration! This is how I spent my not very productive morning. Well, the first was productive as I cut the wood sides for my building and I am pretty sure I like them better now.
Decided to put more holes in for the electric wires and other necessities in the back of the building. I want the top floor to pull out for other access and this has already been a challenge for stairs, etc. I want to use a small plug for the wiring that will go on the top floor so I drilled some holes for the little metal tubes that will form the "outlet." Tubes are wired (stole them from another electrical XMas thing.) These don't go all the way through my plywood back and they also have a large blob of solder on the wires so I figured I would just carve out a place so the wires will fit. Here is where the fun begins.
Dremel tool that I have in my back workroom doesn't have the carving bits. Go to the other room where I have spread out everything and find a couple of possible bits. Go back to the workroom but still don't have the right tool. (It would NEVER occur to me to take the entire box of bits to the workroom :~) ) Finally decide to work on a different part that I really wanted to try out - the drop down part for the chair. It needs to be accessible from the outside of the building and be fairly simple. I decided a fine piece of strong nylon thread might work. Tried to drill holes but the adjustable collet kept loosening so drill bit only worked part way. After a number of tries to tighten it I decided to see if the small drill bit would fit my regular drill. Yup! Great. Plug in drill, doesn't work. Try a different outlet on my strip - still doesn't work. Go to other side of room and plug into a different strip and it works fine! Bring room box to drill and finally get hole drilled. The first cord I tried was a twisted fine silk or nylon and it kept catching on the wood so I finally found a piece of crochet cotton and that seems to work okay. I have the wood trap door hinged temporarily with a piece of masking tape to try all this out and it isn't as loose as I would like but perhaps with the chair on the trap door it will give it more weight. Otherwise a small bit of lead underneath should do it. I also think if I can line the hole that the thread goes through it will be a lot more smooth. At present I can't find anything that will work - trip to hardware store is in order. My next thought is how to anchor the thread on the outside and I have decided a small magnet glued to wood and one to thread should work just fine. Or metal on wood and magnet on thread. Whew! All of this has eaten up a couple of hours and I just needed to get away from it for a bit.
Posted by hilocreations
at 12:01 AM EDT
Updated: Friday, 21 October 2011 4:27 PM EDT
Tuesday, 31 August 2010
No work today. My morning was difficult (changing a flat tire and back was sore) so I spent the afternoon sorting and trying to clear my floor area so I can find tools and not trip on the stuff I had out. Good time to bring this blog up to date.
Posted by hilocreations
at 12:01 AM EDT
Updated: Thursday, 20 October 2011 11:35 PM EDT
Monday, 30 August 2010
I had my miniature club meeting today and asked a member to bring some small punches so I spent much of my time punching out various materials to make plates, meat pies, and have enough left for other things. I found a very gauzy, driapey material to use for the curtains. I wanted to cut scallops at the top to attach to the curtain rod so I coated a line of wood sealer and it cut nicely that way. The brick sheets arrived so I can start painting those soon.
Posted by hilocreations
at 12:01 AM EDT
Updated: Thursday, 20 October 2011 11:35 PM EDT
Saturday, 28 August 2010
I made a big push to get all of the little finishing details done on my piano and I think the end result was worth the effort. Parts of the lightest, finest lace I could find for the antimacassar? Is that what those little drapey things are called? Anyway, cut bits of lace for that and printed tiny photos and made a couple of plates and plate racks using part of some jewelry findings. 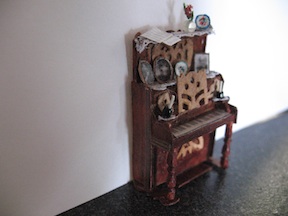 Candles for the sides of the piano were added although I don't think I will wire those for lighting. I didn't want to hide the fancy music rack so I draped some sheet music on the top shelf. I still need to make a piano stool.
Posted by hilocreations
at 12:01 AM EDT
Updated: Thursday, 20 October 2011 11:33 PM EDT
Friday, 27 August 2010
Finished the main part of the piano but need to clean things up and of course do all the finishing touches.  Search will be on for what can go on the piano. I also got the fireplace done except for the bricks inside and that too will need bric-a-brac for the mantle and picture for over it. Finding the stuff I need is very time consuming!
Posted by hilocreations
at 12:01 AM EDT
Updated: Thursday, 20 October 2011 11:33 PM EDT
Thursday, 26 August 2010
I decided to start work on some of the parlor items so I went through the swap items I have received that could work and I started on a tiny Victorian piano (or harmonium?) Got the base of it glued but it was late and have to let glue dry before I can add more to it. I used strip wood for the basic parts and the heavy brown file folder material for the sides and top. It is the weight of thin veneer but doesn't split and is an excellent material to work with. Also have a couple more little lights made and some fiber optic candles. Much more but again will need to have placement first. I have tested the lights and so far everything is working okay but much can happen before it is set!
Posted by hilocreations
at 12:01 AM EDT
Updated: Thursday, 20 October 2011 11:32 PM EDT
Tuesday, 24 August 2010
One of the sockees suggested the tubing from a Q-Tip which was perfect for the thread hole. I realized that I needed to make the false floors so I worked on that today and until I am able to place some furniture I won't know where the electric holes will have to go.
Posted by hilocreations
at 12:01 AM EDT
Sunday, 22 August 2010
I have cut the sides and I have finished the box roof which has the stair-step front. I think it will look pretty Victorian once the bricks are applied. Sides are taped on and roof is set loosely on top.
Posted by hilocreations
at 12:01 AM EDT
Saturday, 21 August 2010
Most of my time was taken up making prototypes - figuring what works for scale, searching my stash for findings and beads, drilling and finally finishing one. Now it should be easier since I know what I am doing (I think). I received a "fire kit" that I had ordered and set it up inside the oven and I love it. The little LEDs flash color and I may try a piece of yellow cellophane instead of the rainbow cellophane that came with it. Planning the lighting and where wires will go took up much of my time and yesterday I started on the roof which will involve some hinge and wiring so I can't really make much progress until that is done. Glued it together and now I need to find my tubing to create the hinge. This will also require more bricks! OUCH! I will spend some time on line looking for QS brick sheets as there is just too much outside area to cover bit by bit with foam egg cartons. I now have a major design problem to work out and writing here should help me. The various levels in the building are different widths and parts would normally be open. But the box has sides so my dilemma is to figure how to integrate the sides with the various levels. Options so far are to cut them off even with the walls or just brick them. The bottom level can be extended a bit to meet the sides which have to be wider to support the street level. I definitely want the curb and cobblestones to be a part of it. The upper level is set back a bit and has a clear piece of acrylic instead of a solid wall. This is to be able to see the barber shop but doesn't need the architectural interest of the shop level. This is the part that will require the most careful thought. It is a "Design as you go" project! I cut a piece of cardboard so I could try out the cut and it seems to be better. I think these decisions and trials are the hardest part of creating what I envision.
Posted by hilocreations
at 12:01 AM EDT
Updated: Wednesday, 1 September 2010 4:19 AM EDT
Thursday, 12 August 2010
Today I have painted and grouted. It has been trial and error to get an effect that I like and I think I am there. First a coat of gesso, black thin acrylic, light grey acrylic - and I paint with my fingers! I want a very uneven color effect with much of the paint mixing together.
After I added the spackle I still wasn't happy with the results. Rubbed on more paint in spots and let things dry. It is now looking pretty decent. Not quite how I planned it to look, but it is an effect of old pavement. I am pretty sure the front opening will swing out okay. There are stairs from the courtyard up to Mr. Todd's barber shop and these will be open stairs so using blocks wasn't an option. There is a technique for measuring for stairs so for anyone wanting to know this is how you do it:  Decide how far out the stairs will go or how steep you want them, and complete a right triangle to the top of the perpendicular line. You now have a properly spaced riser. For this scene I will lay the paper pattern I just made on 2 thin pieces of wood (double sided tape between them) and I will cut the wood risers. The stairs themselves will be cut from very heavy brown file folder. It is easy to cut and work with and is a nice thickness for quarter inch scale. Plus it is almost as strong as wood and has a lot more integrity.
Posted by hilocreations
at 10:19 PM EDT
Updated: Thursday, 12 August 2010 10:58 PM EDT
|


 I haven't posted this week because most of what I have worked on was just finishing and planning. I did create some tiny hurricane lamps that will be lighted with optic fiber, and a couple of other fixtures as well.
 In the photo the oven is tilted because it can not be glued into place just yet but the effect looks pretty good.
