| « | April 2024 | » | ||||
| S | M | T | W | T | F | S |
| 1 | 2 | 3 | 4 | 5 | 6 | |
| 7 | 8 | 9 | 10 | 11 | 12 | 13 |
| 14 | 15 | 16 | 17 | 18 | 19 | 20 |
| 21 | 22 | 23 | 24 | 25 | 26 | 27 |
| 28 | 29 | 30 | ||||
You are not logged in.
Log in
| « | April 2024 | » | ||||
| S | M | T | W | T | F | S |
| 1 | 2 | 3 | 4 | 5 | 6 | |
| 7 | 8 | 9 | 10 | 11 | 12 | 13 |
| 14 | 15 | 16 | 17 | 18 | 19 | 20 |
| 21 | 22 | 23 | 24 | 25 | 26 | 27 |
| 28 | 29 | 30 | ||||
|
Wednesday, 19 October 2011
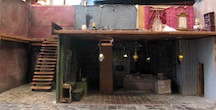
Yesterday and today I worked on finishing some of the fixtures and installing them. I drilled holes in the back wall to accept the wires and the left shop wall received a channel acros s the top so the wires could be glued into the channel. I temporarily ooked up all of the sections to two separate battery packs so I could see where I might need to make changes. A few of the lights still seem too bright so they will be toned down a bit with Sharpies but I need the brightness so the darker areas to the back can be seen, A balancing act for that.
Posted by hilocreations
at 8:18 PM EDT
Updated: Thursday, 15 December 2011 7:44 PM EST
Tuesday, 18 October 2011
First order was to find a clear plastic bead that would work for the globe and I recalled some beads on a garage sale find some time ago. 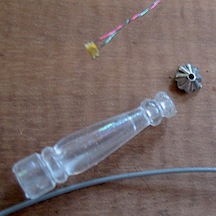 There were some long beads with segments that were exactly the size I needed so I sawed those off and then looked through my bead stash for something for the base. The original long bead, chip LED, base bead and grey wire stripped for attachment. 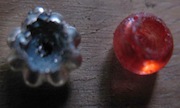 I had to drill part of the beads so they would be wide enough to accept the chip LEDs and after doing that I used a Sharpie pen to color the inside of the clear bead. I then strung the LED through the base and glued the globe over that with the wider side against the light. Fit perfectly! The piece of grey wire was from inside a telephone cable and I pulled out the center wire and insulation so I had a thin hollow tube. This was strung onto the LED wire to create the effect of a gas line. A small flat brass disk finished off the end that will go against the wall. My plan if I am successful is to run the lighting through an arduino which I can program to flicker to emulate flames. If I am able to do the same with optic fiber run through a bugle bead I will also be able to flicker those candles at a different speed. Great plans, now to see if I am able to make them work
Posted by hilocreations
at 8:05 PM EDT
Tuesday, 4 October 2011
Because this is a very dark area of the box I needed to provide enough light for the back and the fixtures needed to be placed so they could clear the walls as I slid the floor into the box. There were many trials and errors as I worked on that but I was finally able to cut the wires and tape them to the ceiling (which will eventually be covered.) 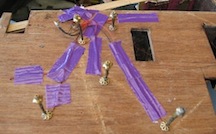
The next problem which took a couple of days to solve was the connection between the battery pack and the sliding floor. Again much trial and error  until I found some old XMas decorations I had purchased on sale to use for the parts. There were plug connectors which I removed and the male part was to be used for the sliding floor and the female part would extend through a hole in the wall so when the floor slid in the parts would line up. Hours of juggling, rebuilding the attachments and generally being frustrated it now finally seems to work. The wires have been soldered but since there may be other lights to add to the mix they are not finished yet. Wonder of wonders it all seems to work and the floor can be removed for access to the wiring and the rooms
Posted by hilocreations
at 7:47 PM EDT
Monday, 26 September 2011
Life and some other commitments have gotten in my way so my project has been on hold for over a month. Last week I was able to get back to work and I decided to work on some of the electrification - especially the most difficult part with the slide out floor.
I had to first design some hanging fixtures to emulate gas lights and at least that part was fairly easy since the covered wires would resemble gas lines. I have found that the very bright LEDs can be toned down by using an ochre colorant inside the beads or on the lights themselves. I used 1mm bright LEDs for these fixtures with faceted plastic beads that I partially cut and drilled large enough to accommodate the light. Another bead from my stash worked well for the base. These were very similar to the lamp I made last year but the cord hangs down feeding the lamp from above.
Posted by hilocreations
at 7:36 PM EDT
Updated: Friday, 21 October 2011 8:03 PM EDT
Tuesday, 23 August 2011
In one of my copies of Scale Cabinetmaker there was a project for a Victorian potbellied stove which I always thought would be fun to do. I seldom use plans or kits but in this case I wanted to transform it into quarter inch scale. I turned the main part of the stove on my lathe and then added the other bits - fine white electric wire, thin zinc printer sheet, beads and a couple of other things. I was very happy with the end result and I know it will take the chill off that infamous barber shop and living quarters. 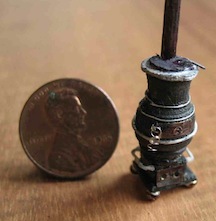
Posted by hilocreations
at 5:05 PM EDT
Saturday, 20 August 2011
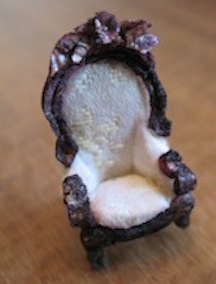
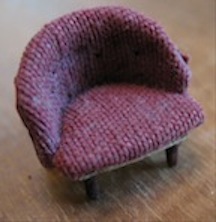
I have been working sporadically and wrote out some of my activities and took photos but I haven't posted for almost a year! I was shocked and thought I had just made a mistake in dates but here I will try to catch up and hope to do better. Since my dates are not accurate I will just post here as I think of things and try to at least get things up to date. I took some trips to the East Coast to visit family and brought materials to work on furniture for the parlour. My efforts worked out well and I even discovered/invented some techniques. Well I hadn't seen them and they were developed by experimentation so I think I invented them. I combed the internet for Victorian furniture at various antique sites. I saved many photos for inspiration andmy next project was to develop ways to construct fancy furniture in quarter inch scale. The answer was that same egg carton foam I had used for brick work. My Victorian sofa was the first (and perhaps best) of my efforts. I was able tocreate the effect of carving onthe back of the sofa and I strengthened the rest of it with filefolder car d stock and bits of wood. This is the end result. I also worked on some chairs which turned out okay as well.
One was an ornate white carved chair using foam, and the other was a tufted barrel chair also shaped using the bottom cup of a foam egg carton.
During this time period I also made many more pieces for the parlor. A desk and book shelf, round table and chairs for tea, and I have planned some candles that I hope to make using optic fiber. I did not photograph all of these pieces as I was working so I will post them in the parlor when that area is finished.
Posted by hilocreations
at 11:36 PM EDT
Updated: Friday, 21 October 2011 4:54 PM EDT
Tuesday, 21 September 2010
I now see another important aspect of posting a blog - or at least writing in it. A break from frustration! This is how I spent my not very productive morning. Well, the first was productive as I cut the wood sides for my building and I am pretty sure I like them better now.
Decided to put more holes in for the electric wires and other necessities in the back of the building. I want the top floor to pull out for other access and this has already been a challenge for stairs, etc. I want to use a small plug for the wiring that will go on the top floor so I drilled some holes for the little metal tubes that will form the "outlet." Tubes are wired (stole them from another electrical XMas thing.) These don't go all the way through my plywood back and they also have a large blob of solder on the wires so I figured I would just carve out a place so the wires will fit. Here is where the fun begins.
Dremel tool that I have in my back workroom doesn't have the carving bits. Go to the other room where I have spread out everything and find a couple of possible bits. Go back to the workroom but still don't have the right tool. (It would NEVER occur to me to take the entire box of bits to the workroom :~) ) Finally decide to work on a different part that I really wanted to try out - the drop down part for the chair. It needs to be accessible from the outside of the building and be fairly simple. I decided a fine piece of strong nylon thread might work. Tried to drill holes but the adjustable collet kept loosening so drill bit only worked part way. After a number of tries to tighten it I decided to see if the small drill bit would fit my regular drill. Yup! Great. Plug in drill, doesn't work. Try a different outlet on my strip - still doesn't work. Go to other side of room and plug into a different strip and it works fine! Bring room box to drill and finally get hole drilled. The first cord I tried was a twisted fine silk or nylon and it kept catching on the wood so I finally found a piece of crochet cotton and that seems to work okay. I have the wood trap door hinged temporarily with a piece of masking tape to try all this out and it isn't as loose as I would like but perhaps with the chair on the trap door it will give it more weight. Otherwise a small bit of lead underneath should do it. I also think if I can line the hole that the thread goes through it will be a lot more smooth. At present I can't find anything that will work - trip to hardware store is in order. My next thought is how to anchor the thread on the outside and I have decided a small magnet glued to wood and one to thread should work just fine. Or metal on wood and magnet on thread. Whew! All of this has eaten up a couple of hours and I just needed to get away from it for a bit.
Posted by hilocreations
at 12:01 AM EDT
Updated: Friday, 21 October 2011 4:27 PM EDT
Tuesday, 31 August 2010
No work today. My morning was difficult (changing a flat tire and back was sore) so I spent the afternoon sorting and trying to clear my floor area so I can find tools and not trip on the stuff I had out. Good time to bring this blog up to date.
Posted by hilocreations
at 12:01 AM EDT
Updated: Thursday, 20 October 2011 11:35 PM EDT
Monday, 30 August 2010
I had my miniature club meeting today and asked a member to bring some small punches so I spent much of my time punching out various materials to make plates, meat pies, and have enough left for other things. I found a very gauzy, driapey material to use for the curtains. I wanted to cut scallops at the top to attach to the curtain rod so I coated a line of wood sealer and it cut nicely that way. The brick sheets arrived so I can start painting those soon.
Posted by hilocreations
at 12:01 AM EDT
Updated: Thursday, 20 October 2011 11:35 PM EDT
Saturday, 28 August 2010
I made a big push to get all of the little finishing details done on my piano and I think the end result was worth the effort. Parts of the lightest, finest lace I could find for the antimacassar? Is that what those little drapey things are called? Anyway, cut bits of lace for that and printed tiny photos and made a couple of plates and plate racks using part of some jewelry findings. 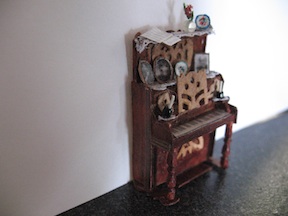 Candles for the sides of the piano were added although I don't think I will wire those for lighting. I didn't want to hide the fancy music rack so I draped some sheet music on the top shelf. I still need to make a piano stool.
Posted by hilocreations
at 12:01 AM EDT
Updated: Thursday, 20 October 2011 11:33 PM EDT
Newer | Latest | Older |