| « | October 2011 | » | ||||
| S | M | T | W | T | F | S |
| 1 | ||||||
| 2 | 3 | 4 | 5 | 6 | 7 | 8 |
| 9 | 10 | 11 | 12 | 13 | 14 | 15 |
| 16 | 17 | 18 | 19 | 20 | 21 | 22 |
| 23 | 24 | 25 | 26 | 27 | 28 | 29 |
| 30 | 31 | |||||
You are not logged in.
Log in
| « | October 2011 | » | ||||
| S | M | T | W | T | F | S |
| 1 | ||||||
| 2 | 3 | 4 | 5 | 6 | 7 | 8 |
| 9 | 10 | 11 | 12 | 13 | 14 | 15 |
| 16 | 17 | 18 | 19 | 20 | 21 | 22 |
| 23 | 24 | 25 | 26 | 27 | 28 | 29 |
| 30 | 31 | |||||
|
Tuesday, 18 October 2011
First order was to find a clear plastic bead that would work for the globe and I recalled some beads on a garage sale find some time ago. 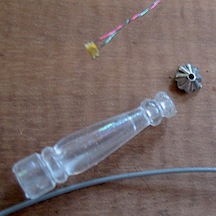 There were some long beads with segments that were exactly the size I needed so I sawed those off and then looked through my bead stash for something for the base. The original long bead, chip LED, base bead and grey wire stripped for attachment. 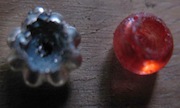 I had to drill part of the beads so they would be wide enough to accept the chip LEDs and after doing that I used a Sharpie pen to color the inside of the clear bead. I then strung the LED through the base and glued the globe over that with the wider side against the light. Fit perfectly! The piece of grey wire was from inside a telephone cable and I pulled out the center wire and insulation so I had a thin hollow tube. This was strung onto the LED wire to create the effect of a gas line. A small flat brass disk finished off the end that will go against the wall. My plan if I am successful is to run the lighting through an arduino which I can program to flicker to emulate flames. If I am able to do the same with optic fiber run through a bugle bead I will also be able to flicker those candles at a different speed. Great plans, now to see if I am able to make them work
Posted by hilocreations
at 8:05 PM EDT
Comments Page
Comments Page
|
